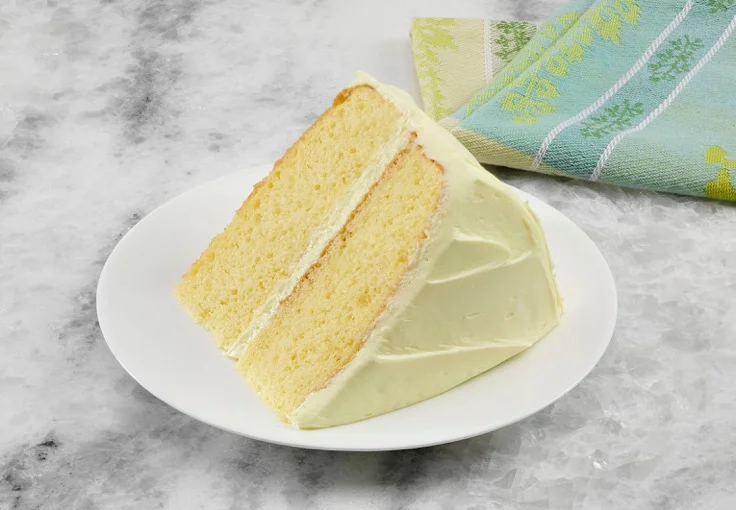
THE PORTILLO'S LEMON CAKE ODYSSEY

THE PORTILLO'S LEMON CAKE ODYSSEY

As a photography partner to Portillo's, the team at FoodPhotoStudio was thrilled to play a small role in the recent "reveal" of their famous "Lemon Cake".  For those of you who may not have heard, a big Portillo's fan launched an Internet campaign recently where he was willing to pay a "bounty" for the recipe to this fables dessert.

We had the awesome chance to be the team that photographed the unveiled dessert treat, and loved seeing this creation splashed all over Chicago area media this week as the announcement by Portillo's was made official.

If you'd like to see Portillo's video and read about the cake, check out their Twitter page. Thanks to the entire crew at Portillo's for continuing to partner with FoodPhotoStudio.com & Curtis Newborn!

Food Photography... Not All Delectable Images Are Created Equal!

Food Photography... Not All Delectable Images Are Created Equal!

Visit any bookstore and check out the cookbook section and you’ll be overwhelmed by the array of books filled with delectable recipes that are accompanied by wonderful photography of the meals that you can prepare.

Colorful stacks of vegetables drizzled with rich sauces on a clean white plate with glistening table settings – you know the shots I'm talking about. Sometimes the photography is almost the true focus of the book, while the recipes take a back seat. But how do someone take photos of food and get such great results? Here's some of the things our team looks at when preparing for any food shoot:

Lighting

We treat the food we're photographing as we would any other still life subject and ensure that it is well lit. Many of the poor examples of food photography that I’ve come across over the years could have been drastically improved with adequate lighting. One place to photograph food is by a window where there is plenty of natural light – perhaps supported with flash bounced off a ceiling or wall to give more balanced lighting that cuts out the shadows. This daylight helps to keep the food looking much more natural.

Props

Pay attention not only to the arrangement of the food itself but to the context that you put it in including the plate or bowl and any table settings around it. Don’t clutter the photo with a full table setting but consider one or two extra elements such as a glass, fork, flower or napkin. These elements can often be placed in secondary positions in the foreground or background of your shot to add just the right amount of flair.

You Must Be Quick

Food doesn’t keep it’s appetizing looks for long so as a photographer we need to be well prepared and able to shoot quickly after it’s been cooked before it melts, collapses, wilts and/or changes color. This means being prepared and knowing what we want to achieve before the food arrives. One strategy that we use is to have the shot completely set up with props before the food is ready and then substitute a stand-in plate to get your exposure right. Then when the food is ready you just switch the stand-in plate with the real thing and you’re ready to start shooting.

Style it

The way food is set out on the plate is as important as the way we photograph it. We pay attention to the balance of food in a shot (color, shapes etc) and leave a way into the shot (using leading lines and the rule of thirds to help guide our viewer’s eye into the dish). 

Enhance it

One tip that we use is to have some vegetable oil on hand and we brush it over food to make it glisten in our shots.

Get Down Low

A mistake that many beginner food photographers make is taking shots that look down on a plate from directly above. While this can work in some circumstances, such as recipe videos or sheets – in most cases you’ll get a more better shot by shooting from down close to plate level, or slightly above it.

Use Macro

Really focusing in upon just one part of the dish can be an effective way of highlighting the different elements of it.

Make it Steam

Having steam rising off your food can give it a ‘just cooked’ feel which some food photographers like. Of course this can be difficult to achieve naturally. I spoke with one food stylist a few years back who told me that they added steam with a number of artificial strategies including microwaving water soaked cotton balls and placing them behind food. This is probably a little advance for most of us – however it was an interesting trick so I thought I’d include it.

Quality Printing from Your Smartphone... Here's How!

Quality Printing from Your Smartphone... Here's How!

There’s something special about a printed photo. Sure, you can share thousands of photos on Facebook, Instagram or Twitter, but none of them will ever be as special as the one photo you hang on the wall in your living room or bedroom.

Today's smartphones have great cameras, and they get better with every generation upgrade. With no tweaking, you’re normally able to print a high-res image that is over a foot wide. With a bit of Photoshop work, you can easily double that, and if you’re prepared to sacrifice some quality, there is really no limit as to how big you can make them. That’s why Apple’s recent “Shot on iPhone” billboard campaign looks so great. Almost every major smartphone comes with a high quality camera, but if you want to print one of those photos, how big can you blow it up? Here are some tips to get the right print for your needs.

What High Quality Printing Means

As anyone who’s tried to print an image they’ve downloaded from Facebook has discovered, not every photo will print nicely. What looks good on your screen might look blurry or pixelated when blown up to wall size. The problem here is resolution. Every image has a resolution. It’s simply the number of pixels it is wide multiplied by the number of pixels it is tall. The image below is 650 pixels wide and 433 pixels tall; that’s 281,450 pixels in total or 0.28 megapixels (a megapixel is a million pixels). While it looks good on screen, if you tried to print a high-res copy, it would be a whopping two inches wide. This is because high-res printing is done at 300 pixels per inch (PPI).

How to Calculate the Maximum High-Res Print Size for a Photo

To find the maximum high-res print size of the images from your smartphone, divide the horizontal and vertical pixel counts by 300. So for example, my iPhone has a 12 megapixel camera. That means any photo taken with it, like the one above, will be 4032 px by 3024 px (provided you’re using the original photo and not one that’s been shrunk or “optimized” for a cloud service). Divide those numbers by 300 and you get 13.44 inches wide by 10.08 inches tall. That’s a pretty decent size canvas!

What About Printing Bigger Images?

Now, that rule only applies to smaller photos. Once you get bigger, PPI stops mattering as much. As I explained in my guide to buying your first high quality camera, megapixels don’t really matter when it comes to cameras, because once you get above about 10 megapixels, you can comfortably print a billboard. At 300 pixels per inch, you can put your nose against a print and it will still look good. For small images, this is really important. People want to get close to see everything. For larger images, however, if you get too close, you can’t see everything. Instead, you need to step back. No one (who is sane, that is) tries to put their nose against a billboard to see what it says. You can get away with having a much lower PPI. So if you want to print a bigger image, you have two options: lower the PPI on the print, or artificially increase the image size.

  • Option One: Lower the PPI

    • Lowering the PPI is the option most printers will take if you ask them to print a large canvas. At 200 PPI, you can print a 12 MP image on a 20.16 inch by 15.12 inch canvas. If you send them a 12 MP photo and ask them to print it on a 20 inch wide canvas, all they will do is print each pixel a little larger. Everything will look good from a few feet away; you just won’t be able to stand as close.


  • Option Two: Increase the Photo’s Resolution

    • While you can just let the printer do their thing, it’s normally better to take matters into your own hands. Why let some stranger make decisions about your images? With Photoshop (or another good image editor), you can increase the size of any image; we’ve looked at how to do it in detail before. Photoshop uses the pixels that are already there to calculate what new pixels should go where. It’s not perfect, but it does a really good job.

In Conclusion

I’ve found you can safely double the horizontal and vertical resolution (so quadruple the size of the image) of a good quality file without too much loss of quality. With my iPhone, that gives me prints that are over two feet wide that look good when viewed up close.

THE FUN WORLD OF FOOD PHOTOGRAPHY TERMINOLOGY

THE FUN WORLD OF FOOD PHOTOGRAPHY TERMINOLOGY

A Little Context About This Post:

Our Founder, Curtis Newborn, shares some insights into the inner workings at one of our brands, FoodPhotoStudio.com. Every industry has its own set of language that makes no sense to those who are unfamiliar. Food photography is no different. There’s all kinds of interesting & unique food photography terms. Some make sense when you think about it. Others, not so much.

Some of Our Most Often Used Food Photography Terminology:

"Stand In Food":  Stand in food is food that you just throw on a plate to rough in your camera angle, your set, your props, and your lighting.  When you have food that will wilt quickly, this is a must.  You can’t rush your set up.  Get everything sorted out with your stand in food.  This term is also used for actors when the huge, famous celebrity isn’t really necessary for the shot.

"Hero Food":  Hero food is the final dish, the perfectly styled dish that will be used as our final shot and given to the client.  When shooting with clients, after the “stand in” is used to set up the shot, we get the “hero” shot done first, and only then do variations if requested, and only if there is time so that we can keep to the schedule.  If you have 6 shots in one day, then you have to break those 6 shots down in your 10-hour day.  Our hero food is also called the “beauty dish” or “beauty shot”.

"Mark The Plate":  There might be other terms for this, but I’ve always told my crew to “mark the plate” before moving anything so that when they take our plate off set, then we will know EXACTLY where it needs to go when it’s brought back in.  You mark your plates with wood blocks or something that will show you where you plate needs to go when you bring it back into the same set. This saves so much time. 

"Spritz It":  When working with food, it’s so important to make sure that no matter what it is, that it doesn’t dry out while it’s on set. Depending on what the food is, it might need a light spray of water from a tiny bottle, or have some oil painted on with a brush.  Either way, the whole idea is to make sure that the food looks fresh, or juicy, or whatever to say it’s fresh.  If it’s a steak, I might say, “Hose it down!”.  Animal proteins really soak up moisture so you really have to make sure you have tons of oil/water on it to keep it looking juicy.

"The Crown & The Heel":  Clients will have their own words for food products.  A common set of food terms for many burger clients is to call the top burger bun the “Crown” and the bottom burger bun  the “Heel”, as it’s much faster to say those words instead of, “get me a new burger bun top”.  The stylist preps the crowns and heels differently depending on how they will be seen in the shot.

"Food Rigging":  Many times with food photography, our food is not doing what we want it to do.  This may require some sort of rigging behind the food or even inside the food to make it stay in the position we want it to be in.  A tiny move one way or another, and unfortunately you can see my rigging, so placement is critical.

"The Martini Shot":  Usually the favorite shot of the day. The martini shot is the last shot of the day or shoot.  Many agencies really expect a dog and pony show.  I always say it’s like a 12-hour party. We make sure that everyone has everything they need throughout the day. This includes food and drinks and there’s always great music playing. We celebrate our martini shot with a drink.  Beer, wine, booze, I make sure we have it there.  It’s a great end to a our shooting day.

To Wrap It Up:

So there you have it!  Terminology that we use in the food photo studio when shooting a variety of projects for clients.  There are many more than what I’ve listed here.  Please leave your comments below with some that you use!
Social Media Is Changing How & Why We Take Photos

Comment

Social Media Is Changing How & Why We Take Photos

It's common sense to not post pictures on social media that may convey an irresponsible lifestyle to current or future employers. But there's a subtler dynamic at play we should consider before we upload that beautiful sunset or skyline image. What if the pictures we post that show us in a positive light are damaging in their own right?

A group of German researchers has published a study called "Envy on Facebook: A Hidden Threat to Users' Life Satisfaction?" It found that one out of three people experienced feelings of jealousy and depression after viewing other people's Facebook pictures. The greatest culprit that bummed out the most people? Vacation shots. For single people in their 30s, happy family pictures made them sad. For women, attractive pics of their female peers made them feel inadequate and invidious.

Posting pictures online is a form of status display. Each says, "Look at how fit and fortunate I am." We never downgrade our status and post pictures of our miserable selves with captions like "Here's me eating a can of tuna fish because I'm broke," or "Here's me alone on my birthday." The worlds of Facebook and other social networks are humble and not-so-humble brag fests of beautifully composed and filtered moments of perfection, a curated hyper reality that true reality has trouble keeping up with.

Our photographic status updates are almost always a way to raise our standing in the eyes of our friends and co-workers, which always means raising our status relative to theirs or even above theirs. It's a form of sharing that excludes. After all, you can only admire the beautiful meal at the three star-restaurant. You can never have a taste. And on some level, the poster is communicating exactly that message to you and inviting your "I hate you so much!" comments.

I believe that all of this is part of a larger and more troubling crisis in our culture—a crisis of happiness. The problem with our hypercompetitive culture is that human happiness risks being reduced to just one aspect of well-being: achievement. When we eat that delicious meal, we need to win at eating that delicious meal and post our achievement online. When we go to Machu Picchu, instead of embracing that trip as a life-enhancing experience, we spend much our time seeing ancient ruins through a camera on our smartphones. Our relationships and parties and concerts are badges to be displayed to our less fortunate peers. Even our charity work and involvement in causes are now ways to publicly display our moral achievements.

When pictures become nothing but badge value and the public exhibition of our personal brand it's not a coincidence that envy and negativity from others will follow. In the end, perhaps the greatest lesson for us, as viewers of other people's photos, is to allow ourselves to truly share in the happiness of the people who count us among their friends, at least nominally. Why not delight in the vacations, family birthdays, personal beauty and culinary adventures of our peers? Why not let our employees share their lives with us, not as possible HR infractions or envy engines, but as evidence that our people are open about their lives, generous in sharing their lives through the creativity of photography and, just maybe, simply happy to be alive?

Comment