Unifest on the River - Chicago Summer Event!

Unifest on the River - Chicago Summer Event!

We love being a Chicagoland company, and being involved in this amazing place we call home. As part of our commitment to promoting the area, we'll from time to time share news and links to cool events and happenings around town.

Unifest on the River

A look at just one part of this amazing walkway...

A look at just one part of this amazing walkway...

Unifest on the River kicks off Thursday, July 13 from 4:30 to 8:30pm on the Riverwalk between Wells and Franklin Streets, with weekly festivals planned every Thursday through August 17. Each event will feature a DJ spinning music from a different country; international beer, wine and spirits; and foreign cuisine. You'll be able to sit by the water and munch on Italian mortadella sandwiches, Swedish meatballs, Chinese chilled noodles, Greek baklava and more.

Click here to see the full lineup of Unifest events, and make your plans to join the fun! 

10 INTERESTING FACTS ABOUT THE 4TH OF JULY

10 INTERESTING FACTS ABOUT THE 4TH OF JULY

The 4th of July holiday commemorates our country’s birthday. On July 4, 1776, the Second Continental Congress met in Philadelphia, adopting the final draft of the Declaration of Independence, proclaiming our sovereignty from Great Britain.

There are so many ways Americans commonly choose to celebrate this holiday – from family-friendly festivals, fireworks and parades to feasting on traditional foods like hot dogs and barbecue... but we thought we'd share some fun tidbits that you can share with friends and family during your celebration of this important holiday!

Here are 10 interesting things you may or may not already know about the 4th of July:

1. Initially adopted by Congress on July 2, 1776, the revised version of the Declaration of Independence was not adopted until two days later.

2. The Declaration of Independence was penned by Thomas Jefferson and signed by 56 men representing 13 colonies. The average age of the Signers of the Declaration of Independence was 45. Benjamin Franklin was the oldest at age 70, and Edward Rutledge was the youngest at age 26.

3. Three U.S. Presidents, John Adams, Thomas Jefferson and James Monroe, died on July 4th; Adams and Jefferson died within hours of each other in 1826 while Monroe died in 1831.

4. In July 1776, the estimated number of people living in the newly independent nation was 2.5 million. According to the U.S. and World Population Clock, the nation’s estimated population in July 2017 will be 325.3 million.

5. The country’s 30th president, Calvin Coolidge, was born on Independence Day in 1872.

6. Americans consume about 155 million hot dogs on Independence Day alone; it is the biggest hot dog holiday of the year.

7. Americans began observing the Fourth of July as early as 1777, when the first-ever major celebration in Philadelphia included a parade and a thirteen-shot cannon salute and fireworks.

8. To avoid cracking it, the Liberty Bell has not been rung since 1846. To mark the quintessential day, every fourth of July it is symbolically tapped 13 times.

9. Eight of the 56 signers of the Declaration of Independence were born in Britain.

10. The American Pyrotechnics Association (APA) estimates that more than 14,000 professional firework displays light up the skies in the United States each 4th of July.

The entire team at Curtis Newborn Photographic wishes you the best for a safe & relaxing holiday!

WHY WE HAVE A FULL PROP ROOM (AND WHY IT IS SO IMPORTANT TO CLIENTS)

WHY WE HAVE A FULL PROP ROOM (AND WHY IT IS SO IMPORTANT TO CLIENTS)

"WHY FOODPHOTOSTUDIO.COM?" FIRST IN A SERIES: PROPS

Key Highlights:

  • Prop rental is expensive
  • Prop stylists charge to select items and return them
  • Sometimes product arrives & it’s not the size or color expected, so you need a plan B, C and D!

I wanted to take a moment to tell you about a new series of posts I'll be writing for our "food studio" in Schaumburg. Today's post if the first, and it talks about props.

How often have you seen a photo of some kind of food, and immediately wanted to take a bite? The importance of portraying “food” in its most delectable form is critical to the success of that product, whether it be for packaging, an advertisement, or even on a menu. But it’s so much more than just properly cooking or preparing the food. The real key to how great a “food photo” looks is the propping. 

In this first in a series of “Why FoodPhotoStudio.com”, we’re taking a look at “propping” and “why” there is such a difference in not only “how” it’s done, but also the most efficient, cost-effective way to go about it.

At FoodPhotoStudio.com, we’re different from most studios in that we have literally thousands of props dedicated to “food photography”, all available to our clients at no additional charge. Why do we do it? Because prop rental can be very expensive, and we’ve found that by providing this vast collection of propping to our clients for free, they reap the benefit of having everything they need, even if there is a last-minute “change of plans” for a shot, plus their photography projects become much more cost effective and time efficient… no running to stores to look for props, or searching online and waiting for props to arrive in the mail for a shoot.

For 40 years we have purchased props and kept half of them to add to the arsenal…giving you more options to select on set.

Plus, we find that clients (art directors, designers, etc.) will come and “shop” our prop room when they are in the planning stages for their shoot. They’ll browse our over 1,500 square foot showroom and get ideas for the propping, and then we can catalog and tag the items we’ll need come “shooting day”, which cuts down on the downtime in studio for our clients. 

And if by chance there is a truly unique prop that you need, and we don’t have it, our team will do the research and shopping for the prop. And by charging a nominal fee for this service, it saves the client time, and then that prop gets added to our collection so that it’s available for them (as well as other clients) for any shoots down the road.

So, if you’re thinking about food photography, give us a look… and check back here each month on our blog for more creative ideas about “why” FooodPhotoStudio.com is THE place in Chicagoland for highly creative, cost effective imagery! Contact us for your no-obligation tour.

Celebrating 80 Years As A National Icon

Comment

Celebrating 80 Years As A National Icon

I recently traveled to San Fransisco for a conference, and while there captured this image of what I consider to be one our our nation's most beautiful symbols... the Golden Gate Bridge. 


My image of the Golden Gate Bridge, captured May 2017.

My image of the Golden Gate Bridge, captured May 2017.


While there, I learned that they were celebrating 80 years of existence, and they are commemorating this milestone on Facebook with an 80th anniversary event page and on Twitter, using the #GGB80 and #MyGGBStory hashtags. Each week, they'll share new imagery of the bridge, captured by fans of the iconic structure and shared via social media.

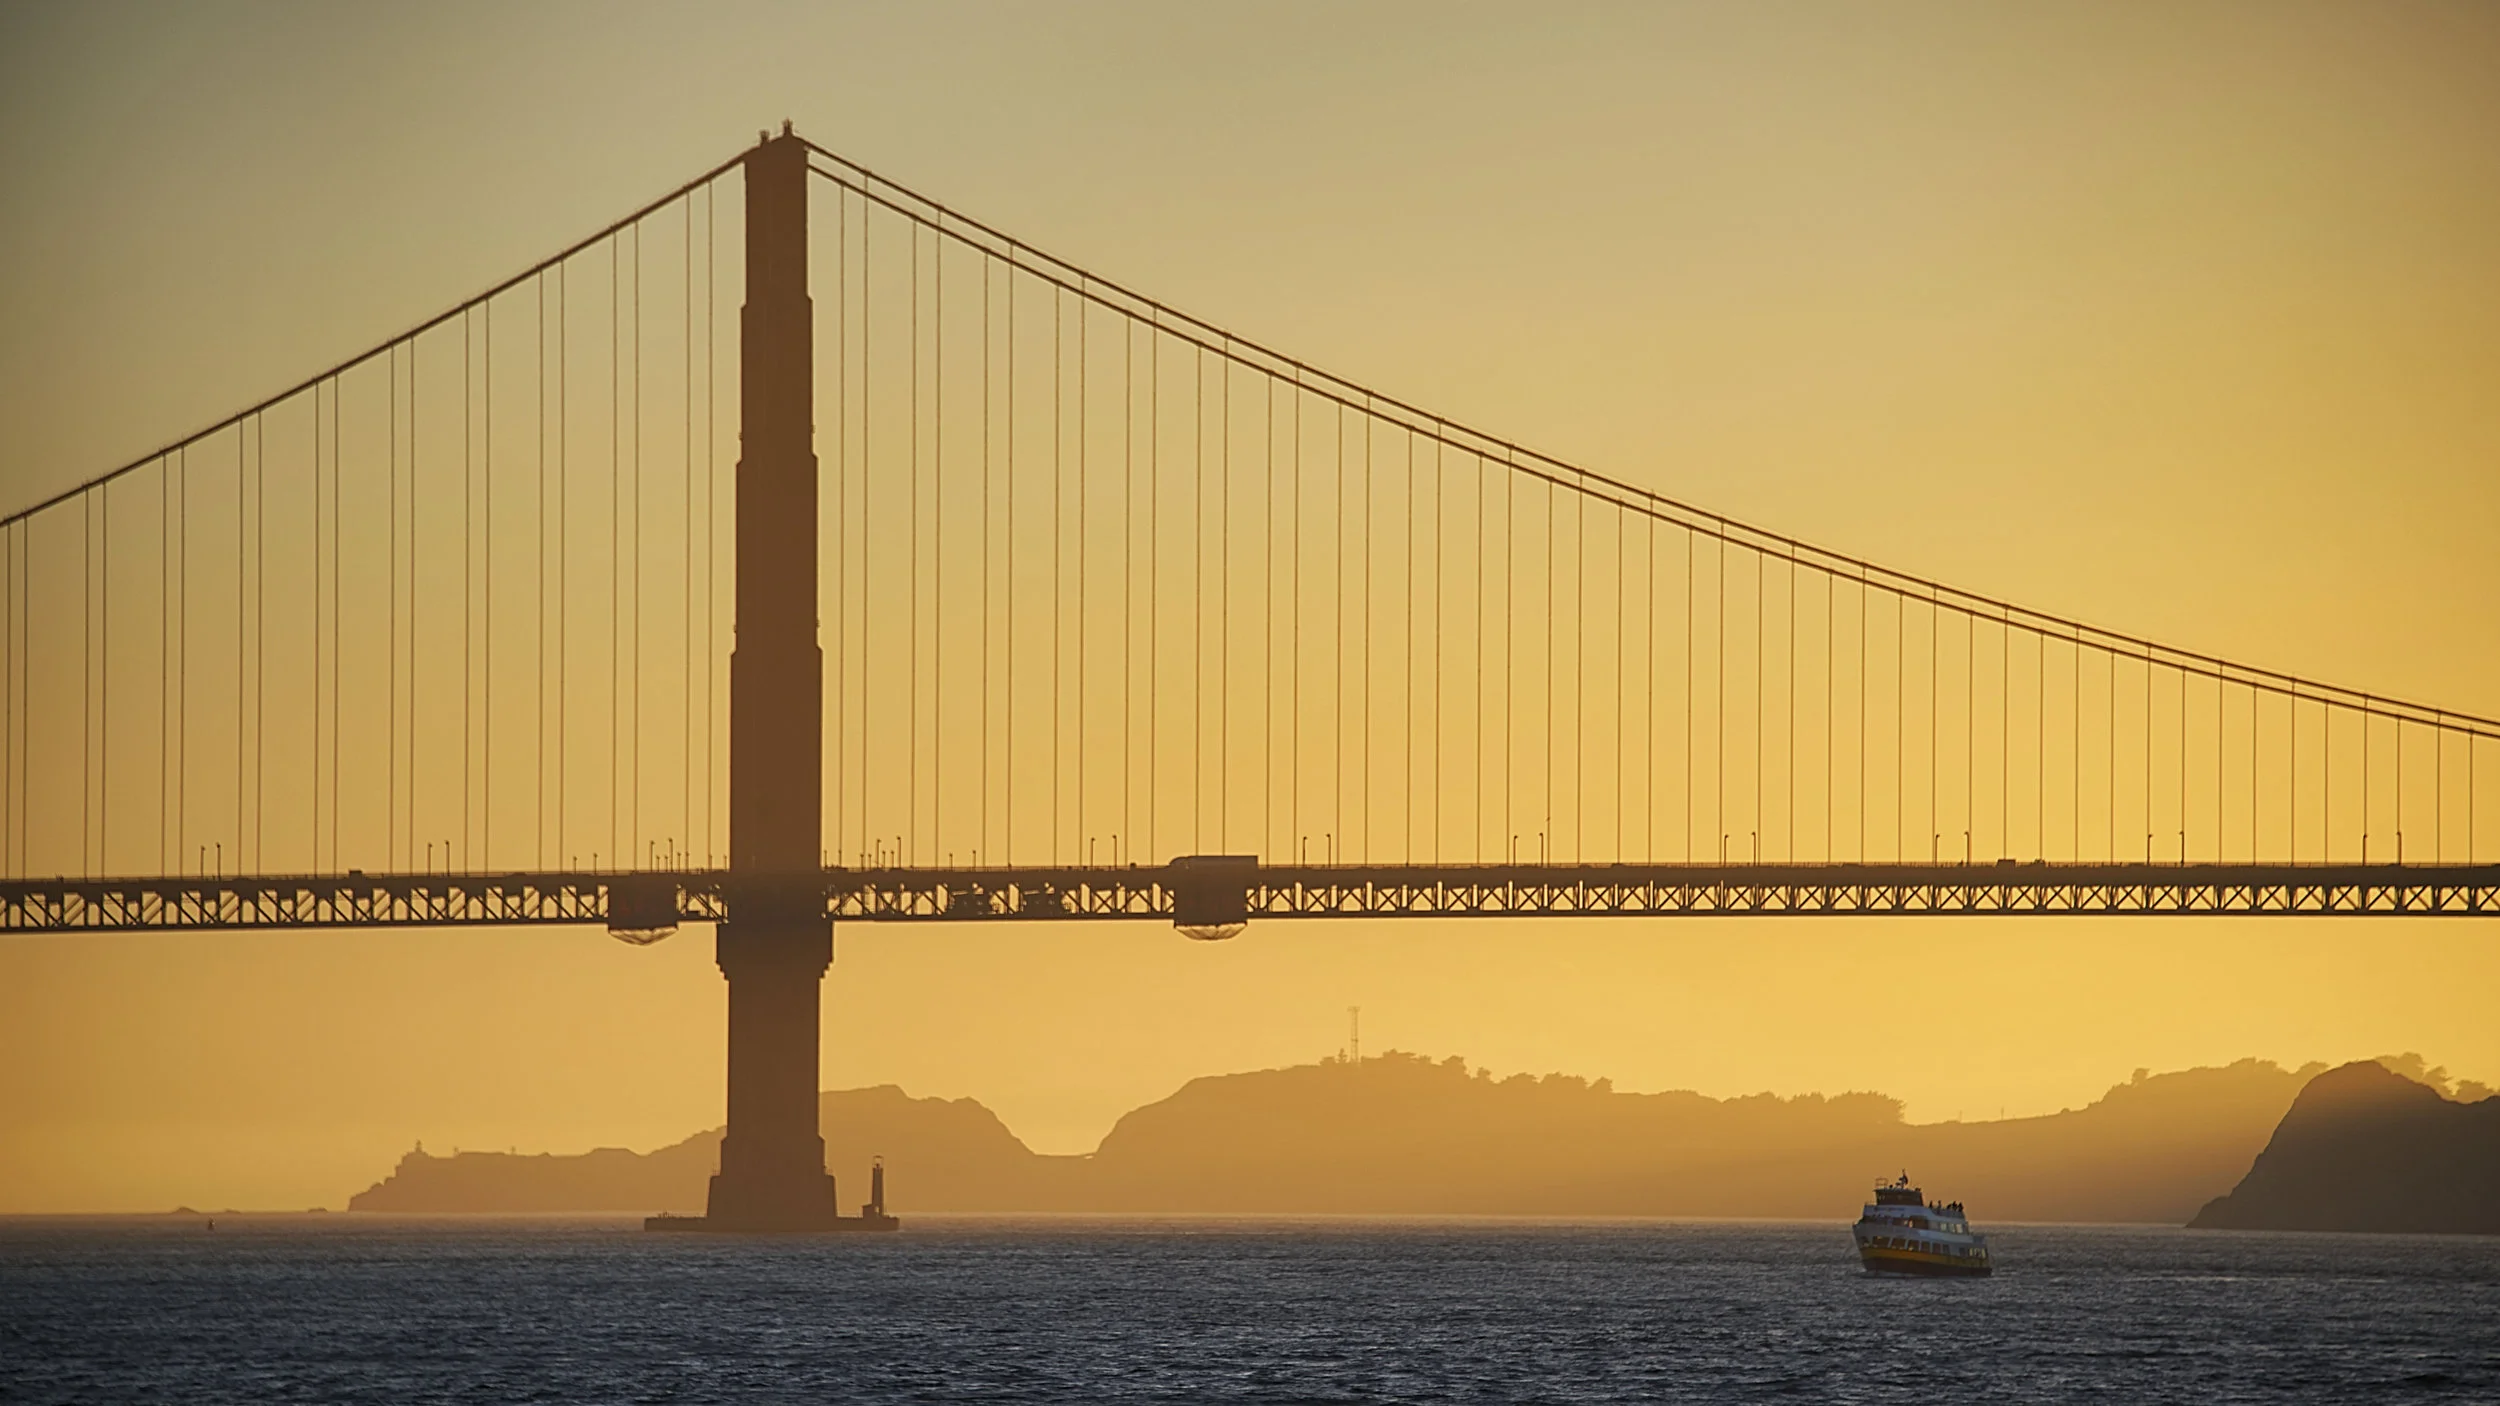
The Golden Gate Bridge spans the Golden Gate Strait – the entrance to the San Francisco Bay from the Pacific Ocean – from San Francisco to Marin County. Its distinctive “international orange” color blends well with the span’s natural setting and provides enhanced visibility for passing ships. The Bridge opened to pedestrians on Thursday, May 27, 1937, and to vehicles the very next day, Friday, May 28, 1937. Below, you can check out some more cool facts shared with me about the bridge.

80 Facts Of The Golden Gate Bridge:

1. The bridge’s steel came from Maryland, New Jersey, and Pennsylvania, shipped by way of the Panama Canal.

2. Eighty years ago it was the longest suspension bridge in the world, but now it ranks as only the ninth.

3. Its towers were the world’s tallest until 1998.

4. The first earthquake hit it in 1935, before the bridge was even finished. The construction elevator broke, leaving a dozen workers stuck on one of the main towers while it swayed.

5. The paint company Sherwin-Williams sells the bridge its paint, although they must put in a competitive bid on the contract each time.

6. If you want to replicate the signature color, International Orange, the Golden Gate District recommends giving paint stores the following mix formula: C= Cyan: 0%, M =Magenta: 69%, Y =Yellow: 100%, K = Black: 6%.

7. The aerospace industry originally developed the color to make building elements more visible.

8. The U.S. War Department wanted the bridge painted in yellow and black stripes to increase its visibility to ships.

9. And the U.S. Air Corps wanted red and white stripes. Fortunately, bridge architect Irving Morrow convinced everyone to go with the orange shade instead.

10. For the record, Morrow was a graduate of UC Berkeley.

11. Chief Engineer Joseph Strauss developed a fascination with suspension bridges while hospitalized in a room overlooking the John A. Roebling Bridge.

12. There’s only one other International Orange colored suspension bridge in the world: the 25th of April Bridge in Lisbon, Portugal.

13. The foremen of the bridge’s ironworkers are called “pushers” in bridge lingo. Which is disconcerting, given the elevation.

14. Incidentally, a pusher makes roughly $94,000/year before benefits and overtime. Bridge painters receive about $47/hour at entry level. Ironworkers start at about $45/hour.

15. Joseph Strauss’s own fee as chief engineer in 1937: $1 million, more than $17.3 million in today’s currency.

16. Bridge builders made $11/hour.

17. Eleven men died during the bridge’s four-plus year construction, 10 of them from a single accident in which a collapsed scaffold fell through the safety net below.

18. In that same scaffold collapse, one worker managed to jump to safety. Two others plunged into the bay but miraculously survived.

19. Worker deaths sparked official investigations, but all told the bridge had a remarkable safety record during a time when most big steel projects killed “one man for every $1 million spent,” as the proverbial formula went.

20. A lot of that had to do with the bridge’s $130,000 safety net, which saved the lives of 19 people.

21. The bridge has closed to all vehicular traffic only eight times in 80 years: Three times for wind hazards, once for construction, twice for anniversary galas (in 1987 and 2012), and twice very briefly for “visiting dignitaries”—President Franklin D. Roosevelt and president of France Charles de Gaulle.

22. Total closure time: 16 hours, 48 minutes, give or take.

23. Forty-two Navy ships sailed under the bridge during its opening celebration.

24. The all-time record for bridge crossings in one day: October 27, 1989, at 162,414 vehicles. Diversions from the Loma Prieta earthquake accounted for the spike in traffic.

25. The bridge district gets frequent requests to scatter cremated remains from the bridge, but “any person who willfully drops or throws any object or missile from any toll bridge is guilty of a misdemeanor.”

26. The city would also not allow British filmmakers to drop a dummy off the bridge while filming the climax of A View To A Kill (1985), starring Roger Moore as James Bond.

27. According to the movie database site Subzin, characters in extant major Hollywood films and TV series have spoken the phrase “Golden Gate Bridge” 175 times.

28. Up until 1970 the bridge charged a fee for pedestrians to cross, enforced by a turnstile. The original toll was a nickel and had risen to a dime 33 years later.

29. But the fee to walk across on opening day in 1937 was a quarter. Some 15,000 people crossed every hour.

30. The original auto toll: 50 cents, plus an extra nickel for every additional passenger. Motorcycles paid a quarter.

31. President Franklin D. Roosevelt officially declared the bridge open by tapping a golden telegraph key in the Oval Office.

32. Each bridge tower contains 600,000 rivets.

33. The bridge came in exactly on budget: $35 million. That’s over $60.6 million after inflation. However...

34. The district estimated that with higher modern construction costs, creating the same bridge in 2003 would cost $1.2 billion. Roughly $1.61 billion in 2017.

35. Almost all of the money came from bonds, with very little kicked in by state or federal government.

36. E.W. Bullard, inventor of the original hard hat, specially modified his designs to create a bridge worker’s hat specifically for the Golden Gate Bridge build.

37. Management administered sauerkraut juice as a hangover cure to workers.

38. Another innovation: “Glare-free goggles” to prevent snow-blindness from the constant reflection on the water.

39. Historian Stephen Cassady says the bridge build was the first major engineering job to fire workers for failing to follow safety protocols.

40. The federal government’s War Department had to issue the bridge permits, since it owned the land on both sides.

41. Originally, the U.S. Navy worried that if the bridge collapsed (due to warfare) that it would trap ships inside the bay.

42. San Franciscans filed over 2,300 lawsuits against the bridge before construction even started. Some things never change.

43. Although the entire bridge is 1.7 miles, only 1.2 miles of that is actual suspension span.

44. The original weight of all of the materials: 894,500 tons.

45. By 1986, however, that had come down to 887,000 tons. The bridge shed some weight over the years thanks to lighter replacement materials.

46. Note that only 88,000 tons of that is steel.

47. Weight of the cables alone (suspender and main): roughly 24,500 tons.

48. The same company (Roebling's Sons) manufactured the cables for the Golden Gate Bridge and the Brooklyn Bridge.

49. Charles Ellis, a Vice President at Strauss Engineering Corporation, did most of the bridge’s design work. In December of 1931, his bosses sent him on vacation, then fired him while he was away, and to this day no one knows exactly why.

50. Incidentally, the bridge honchos didn’t formally acknowledge Ellis’ work until 2007.

51. Fitness guru Jack LaLanne swam the length of the bridge in 1954 with 140 pounds of equipment strapped to his back.

52. Three women have given birth while on the bridge, in 1958, 1991, and 1993. The babies were all boys.

53. In 2001, students from the University of British Columbia School of Engineering hung a Volkswagen Beetle off the side of the bridge in the dead of night. No one else was as amused as they were.

54. You are not allowed to cross the bridge on horseback.

55. In 2005, a six-foot-tall ostrich escaped from a van and remained at large (very large) on the bridge until recapture. The driver reported that “the ostrich's butt broke the window,” when he braked, adding, “You never would think an ostrich could fit through a little window, but she did."

56. And in 2004, a deer ran the entire length of the bridge and entered the Presidio via the FastTrak lane. In 2014, two more leisurely deer crossed, stopping traffic.

57. But the bridge’s most frequent animal commuters are coyotes, who use it to migrate to the city when territory on the north side gets too crowded.

58. The first official proposal for a bridge to Marin came in 1872 from the Central Pacific Railroad.

59. The first accidental death on the bridge (after construction): Cyril McNear, a Russian immigrant killed in a car crash on September 7, 1939. McNear is now buried in Colma’s Cypress Lawn Memorial Park.

60. But the first suicide happened in August of 1937, when H.B. Wobber, a barge worker and war veteran, got off a bus and jumped.

61. There are 128 lampposts along the span.

62. Each of the main cables is 7,650 feet, but the total length of wire used in both is over 80,000 miles.

63. The cable manufacturers had to design a new system capable of producing 1,000 feet of cable per day in order to fill the order in the 14 months the city gave them.

64. In 1937, newspapers reported two different women as the winner (“Fiesta Queen”) of a beauty pageant at the opening celebration. Historians have still not figured out who really won.

65. Fifty thousand people were anticipated for the bridge’s 50th anniversary celebration. The real crowd was about 800,000.

66. So many people arrived at the 50th bash, in fact, that the bridge sagged ten feet, and the swaying left many dizzy and panicked. It was the largest load ever put on the span.

67. Prior to bridge construction, crossing the bay by ferry took 20-30 minutes.

68. For being the one billionth car across the bridge in 1985, a local dentist received a case of champagne and a hard hat.

69. Average daily crossings in 1937: 9,073, more than 3.3 million that first year.

70. But for just May and June of that year, the average was 17,339/day.

71. Total fare revenue for the first year: $1,594,958, almost 20 percent of that earned during the first two months.

72. The largest year over year traffic increase: 1945-1946, when bridge crossings spiked more than 39 percent.

73. Conversely, the largest year-over-year decline was only 9.9 percent, from 1943 to 1944.

74. According to the original roadway rules issued 80 years ago, “Tire repairs and changes shall not be made except when authorized by a member of the Highway Patrol and done in his presence.”

75. Even today, bridge workers operate the fog horns with a manual switch.

76. In August of 1992, the bridge foghorns blew for 359 straight hours.

77. Naturally, such a high profile landmark has a ghost story attached, and equally naturally this ghost is supposedly a ship, the Tennessee, a clipper lost in the strait in 1853 and sometimes reported still sailing in the fog.

78. “Golden Gate” refers to the name of the bay entrance itself rather than the color of the bridge (which is of course not gold). John C. Fremont gave the strait this moniker in 1846.

79. Only the south entrance to the Robin Williams Tunnel (formerly Waldo Tunnel) bears the rainbow paint job so as not to be an eyesore for homeowners whose properties face the north side.

80. And finally, the bridge is not, in fact, painted end to end each year. Every San Franciscan should know this by now, but bridge management are forever trying to dispel the myth.

If you like my photo of the bridge, please let me know, and feel free to share this post on your social media feeds!

Comment

TRIPODS - HOW TO PICK THE RIGHT ONE!

TRIPODS - HOW TO PICK THE RIGHT ONE!

Yes, you need a tripod. Whether you shoot digital, film or video, you need a tripod. That slight blurriness that you sometimes get from your zoom lens (or even from your long-range-zoom compact camera) is not the fault of your camera, it’s the fault of "camera shake". Why do you think shake reduction has become a standard feature on almost every camera or lens these days? Shake reduction is awesome, but only up to a point. Add to your mix a tripod and you have the original—and still most reliable—way to eliminate shaky shots.

Tripods are also great for shooting available-light scenes without a flash, as well as seamless panoramas, fireworks, family portraits (with you in the picture, for a change!), shots of the stars or moon, and dozens of other situations that require long exposures. You’ll also get better, sharper close-up images if you use a tripod, because you can use a smaller aperture and a slower shutter speed without the fear of camera movement.

There are literally hundreds (if not thousands) of tripods out there on the market for still and video photography. So how do you narrow down the choice to just what you want? Let’s dive in and take a look at the components that make up a tripod.

Understanding Tripods


There are seven components that make up all tripods:

  • Collapsed size
  • Size
  • Load capacity
  • Head type
  • Feet
  • Leg locks
  • Common material

The more you know about each, the easier it will be to buy the perfect tripod for your picture-taking needs, so read on to better understand the makeup of a tripod:

Collapsed Size – Collapsed Size is how long the tripod measures with everything folded up. This is important especially if you are traveling and need to pack the tripod in a bag. This number will let you know if it’ll fit.

Size – Maximum Height Extension is how tall the tripod will stand when every leg, along with the center post is raised as far as it will go.

Load Capacity – Don’t confuse weight with Maximum Load Capacity. The weight is how much the tripod weighs. The Maximum Load Capacity is the heaviest camera and lens combination the tripod will handle. If you put a camera that’s heavier than the Maximum Load Capacity on a tripod, you run the risk of a piece collapsing, causing damage to both the tripod and the camera. So, it’s very important to know how much your camera weighs with its heaviest lens and flash attached, and then you buy a tripod that is rated to handle that amount of weight.

Head Type – Most tripods come with a head, but it may not be the ideal one for your purposes. The head sits atop the center column, a tube in the center of the tripod’s construction that can be raised and lowered either with a hand crank or via a locking collar.

Feet – Feet come in rubber non-slip (used for most indoor and some outdoor shooting); spike (best for outdoor shooting, the spikes hold the tripod firmly in the ground); and custom (which could be anything, including ball-bearings).

Leg Locks – Leg locks are available in Twist (twist the leg to pull it out, twist it in reverse to lock it in position), Lever (open a lever to pull a leg out, close it to lock it) and custom options.

Common Material – (Which is what most of the tripod is made of) is either plastic (the least expensive, but not very durable), aluminum (inexpensive and most commonly used, but in heavy-duty tripods can add a lot of weight), carbon fiber (a relatively new material for tripods, it’s durable, lightweight, and flexible–ideal for most uses–but it’s expensive), and wood (typically used by nature photographers who don’t mind toting large-format cameras).

So what is the best tripod for you?

While there are many different kinds of tripods, we can divide them into five basic groups: Pocket, Tabletop, Portable, Medium Duty, and Studio Grade. The category names suggest their primary applications. 

Types of Tripods

Pocket Tripods: These can be a real life saver when you’re trying to shoot that impromptu family group picture and want to include yourself in it. Typically measuring less than five inches collapsed, pocket ‘pods slip easily into a bag or waist-pack and are very handy at parties, restaurants, and other places where you may not want lug something bigger. They’ll support the weight of a compact digital camera (be careful not to overload them!). Look for one that has some sort of adjustable head, even if it’s primitive. There are even small tripods that will hold your cell phone camera steady!

Best used for:

  • Self-portraits

  • Group shots

  • Party pictures–with you in them

  • Small, light cameras


Tabletop Tripods: These are excellent for group pictures and other situations where the camera can be positioned on a flat surface other than the ground. They’re light, small, and easy to pack so they’re perfect for travel. Put it on a table, set the self-timer, and you can include yourself in the shot. Or, turn your tabletop tripod sideways and place it against a wall to give you more stability when shooting. And since they hold the camera no more than 12 inches off the ground, they’re great for down-to-earth subjects, including close-up flower photography.

Best used for:

  • Self-portraits

  • Group shots

  • Macro/close-up/nature

  • Small cameras


Travel Tripods: These help raise your camera well off the ground, but collapse to an easy-to-carry size. They’re are great for hiking, biking, and that casual stroll through the nature center. These will support a DSLR with a kit lens, or even a modest zoom lens. Compact video cameras can also be used on these tripods. But be cautious if you use a long zoom, especially if it’s front heavy, as this could cause the camera to tip. Most of these elevate to just below eye-level, but the trade-off is their wonderful portability.

Best used for:

  • Nature

  • Travel

  • Sports

  • Amateur video

  • Small DSLRs

  • Compact cameras


Medium Duty Tripods: This type of tripod fills the gap between lightweight portable jobs and heavyweight studio tripods. They can be used for nature photography (if you have a strong back), portable portrait set-ups, and yes, studio work. The advantage over portable pods is that most models raise to eye level or higher, they are heavier and therefore sturdier. While many come with heads, you can buy some models without a head and then create a custom configuration by buying the head separately.

Best used for:

  • Nature

  • Birding/Wildlife photos

  • Sports

  • Weddings and events

  • Location portraits

  • Macro/close-up photography

  • Medium-format cameras


Studio Grade Tripods: These tripods are exactly that... "pro line" quality and strength. This is the domain of professional photographers who generally buy a specific type of tripod to fit a specific need. They are big, sometimes immovable and nearly always used with a specialized head. They are designed to handle medium- and large-format cameras. But in today's digital era, these tripods are becoming less common.

Best used for:

  • Studio photography

  • Advertising

  • Still life

  • Medium-format cameras

  • Large-format cameras


In Conclusion...

The characteristics listed above are meant to guide you to the right category, thus speeding up your research and shortening the buying process. Additionally, of course, there’s the matter of price… but please don’t let that be your only guide, as a really good tripod will last you a lifetime and deliver you great results.  Good luck, and happy shooting!